Troubleshoot import and export issues
General guidelines for importing data
- For larger projects, do not upload data through the Label Studio interface. This works fine for proof of concept projects, but it is not recommended for larger projects. We recommend that you configure external storage instead.
- It’s best to keep about 100k tasks / 100k annotations per project for optimal performance.
- Avoid frequent imports because each new import requires lengthy background operations. One import per 30 seconds will work without overloads.
- If your API requests exceed our limits per request, they will be truncated. T
Troubleshoot cloud storage
When working with an external Cloud Storage connection (S3, GCS, Azure), keep the following in mind:
- Label Studio doesn’t import the data stored in the bucket, but instead creates references to the objects. Therefore, you have full access control on the data to be synced and shown on the labeling screen.
- Sync operations with external buckets only goes one way. It either creates tasks from objects on the bucket (Source storage) or pushes annotations to the output bucket (Target storage). Changing something on the bucket side doesn’t guarantee consistency in results.
- We recommend using a separate bucket folder for each Label Studio project.
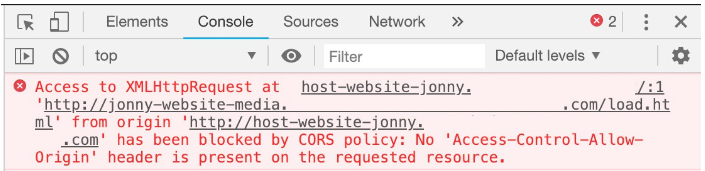
CORS errors
If you have not set up CORS, you cannot view cloud storage data from Label Studio. You might see a link to the data rather than a preview of the data, or you might see a CORS error in your web browser console:
- For Amazon S3, see Configuring and using cross-origin resource sharing (CORS) in the Amazon S3 User Guide.
- For GCS, see Configuring cross-origin resource sharing (CORS) in the Google Cloud Storage documentation.
- For Microsoft Azure, see Cross-Origin Resource Sharing (CORS) support for Azure Storage in the Microsoft Azure documentation.
note
-
Make sure to apply the correct role and permissions for your Service Account. For example, Service Account Role "roles/iam.serviceAccountTokenCreator" to the Service Account.
-
If the name of the Service Account
labelstudiois using the error displayed in the DEBUG logs, then you can enable them using the--log-level DEBUGflag in thelabel-studio startcommand.
403 errors
If you see 403 errors in your web browser console, make sure you configured the correct credentials.
Google Cloud Storage credentials
See Setting up authentication and IAM permissions for Cloud Storage in the Google Cloud Storage documentation.
Your account must have the Service Account Token Creator role, Storage Object Viewer role, and storage.buckets.get access permission.
Also, if you’re using a service account to authorize access to the Google Cloud Platform, make sure to activate it. See gcloud auth activate-service-account in the Google Cloud SDK: Command Line Interface documentation.
Amazon S3 credentials
For Amazon S3, see Configuration and credential file settings in the Amazon AWS Command Line Interface User Guide. Also check that your credentials work from the aws client.
Ensure that you specified the correct region when creating a bucket. If needed, change the region in your source or target storage settings or the
.aws/configfile, otherwise you might have problems accessing your bucket objects.
For example, update the following:~/.aws/config[default] region=us-east-2 # change to the region of your bucket
- Ensure that the credentials you used to set up the source or target storage connection are still valid. If you see 403 errors in the browser console, and you set up the correct permissions for the bucket, you might need to update the Access Key ID, Secret Access Key, and Session ID. See the AWS Identity and Access Management documentation on Requesting temporary security credentials.
Clicking Sync does not update my data
Sometimes the sync process doesn’t start immediately. That is because syncing process is based on internal job scheduler. If after a period of time nothing happens, follow the steps below.
First, check that you have specified the correct credentials (see Google Cloud Storage credentials and Amazon S3 credentials above).
Then go to the cloud storage settings page and click Edit next to the cloud connection. From here, you can check the following:
The File Filter Regex is set and correct. When no filters are specified, all found items are skipped. The filter should be a valid regular expression, not a wildcard (e.g.
.*is a valid,*.is not valid)Treat every bucket object as a source file should be toggled
ONif you work with images, audio, text files or any other binary content stored in the bucket.This instructs Label Studio to create URI endpoints and store this as a labeling task payload, and resolve them into presigned
httpsURLs when opening the labeling screen.If you store JSON tasks in the Label Studio format in your bucket - turn this toggle
OFF.Check for rq worker failures. An easy way to check rq workers is complete an export operation.
From the Data manager, click Export, and create a new snapshot and download the JSON file. If you see an Error, most likely your rq workers are having problems. Another way to check rq workers is to login as a superuser and go to the
/django-rqpage. You should see aworkerscolumn. If the values are0or the column is empty, this can indicate a failure.
If none of these steps work, submit a ticket and include the time when you launched the Sync job.
JSON files from a cloud storage are not synced and the data manager is empty
Edit the storage settings to enable Treat every bucket object as a source file. If you see tasks in the Data Manager, proceed to step 2.
Disable Treat every bucket object as a source file.
If you don’t see tasks in the Data Manager, your bucket doesn’t have GET permissions, only LIST permissions.
If there is only LIST permission, Label Studio can scan the bucket for the existence of objects without actually reading them. With GET permissions, Label Studio can read the data and extract your JSON files appropriately.
Tasks don’t load the way I expect
If the tasks sync to Label Studio but don’t appear the way that you expect, maybe with URLs instead of images or with one task where you expect to see many, check the following:
- If you’re placing JSON files in cloud storage, place 1 task in each JSON file in the storage bucket. If you want to upload a JSON file from local storage into Label Studio, you can place multiple tasks in one JSON file.
- If you’re syncing image or audio files, make sure Treat every bucket object as a source file is enabled.
Troubleshoot pre-annotations
Units of image annotations
The units the x, y, width and height of image annotations are provided in percentages of overall image dimension.
Use the following conversion formulas for x, y, width, height:
pixel_x = x / 100.0 * original_width
pixel_y = y / 100.0 * original_height
pixel_width = width / 100.0 * original_width
pixel_height = height / 100.0 * original_height
For example:
task = {
    "annotations": [{
        "result": [
            {
                "...": "...",

                "original_width": 600,
                "original_height": 403,
                "image_rotation": 0,

                "value": {
                    "x": 5.33,
                    "y": 23.57,
                    "width": 29.16,
                    "height": 31.26,
                    "rotation": 0,
                    "rectanglelabels": [
                        "Airplane"
                    ]
                }
            }
        ]
    }]
}

# convert from LS percent units to pixels
def convert_from_ls(result):
    if 'original_width' not in result or 'original_height' not in result:
        return None

    value = result['value']
    w, h = result['original_width'], result['original_height']

    if all([key in value for key in ['x', 'y', 'width', 'height']]):
        return w * value['x'] / 100.0, \
               h * value['y'] / 100.0, \
               w * value['width'] / 100.0, \
               h * value['height'] / 100.0

# convert from pixels to LS percent units
def convert_to_ls(x, y, width, height, original_width, original_height):
    return x / original_width * 100.0, y / original_height * 100.0, \
           width / original_width * 100.0, height / original_height * 100


# convert from LS
output = convert_from_ls(task['annotations'][0]['result'][0])
if output is None:
    raise Exception('Wrong convert')
pixel_x, pixel_y, pixel_width, pixel_height = output
print(pixel_x, pixel_y, pixel_width, pixel_height)

# convert back to LS
x, y, width, height = convert_to_ls(pixel_x, pixel_y, pixel_width, pixel_height, 600, 403)
print(x, y, width, height)
Annotators cannot see predictions
If annotators can’t see predictions or if you encounter unexpected behavior after you import pre-annotations into Label Studio, review this guidance to resolve the issues.
In the Settings > Machine Learning section for your project, make sure that the following settings are configured:
- Enable Show predictions to annotators in the Label Stream and Quick View
- Select the relevant Model Version in the drop-down. If there is no drop-down menu visible, there might not be a model version listed for the pre-annotations, or there might be another issue happening.
- Disable the option to Reveal pre-annotations interactively, which requires manual action from annotators to display pre-annotated regions.
Check the configuration values of the labeling configuration and tasks
The from_name of the pre-annotation task JSON must match the value of the name in the <Labels name="label" toName="text"> portion of the labeling configuration. The to_name must match the toName value.
In the text example on this page, the JSON includes "from_name": "label" to correspond with the <Labels name="label" and "to_name": text to correspond with the toName="text of the labeling configuration. The default template might contain <Labels name="ner" toName="text">. To work with this example JSON, you need to update the values to match.
In the image example on this page, the XML includes
...
<Choices name="choice" toName="image" showInLine="true">`
...
<RectangleLabels name="label" toName="image">
...
To correspond with the following portions of the example JSON:
...
"type": "rectanglelabels",
"from_name": "label", "to_name": "image",
...
type": "choices",
"from_name": "choice", "to_name": "image",
...
Check the labels in your configuration and your tasks
Make sure that you have a labeling configuration set up for the labeling interface, and that the labels in your JSON file exactly match the labels in your configuration. If you’re using a tool to transform your model output, make sure that the labels aren’t altered by the tool.
Check the IDs and toName values
If you’re performing nested labeling, such as displaying a TextArea tag for specific Label or Choice values, the IDs for those results must match.
For example, if you want to transcribe text alongside a named entity resolution task, you might have the following labeling configuration:
<View>
  <Labels name="label" toName="text">
    <Label value="PER" background="red"/>
    <Label value="ORG" background="darkorange"/>
    <Label value="LOC" background="orange"/>
    <Label value="MISC" background="green"/>
  </Labels>
  <Text name="text" value="$text"/>
  <TextArea name="entity" toName="text" perRegion="true"/>
</View>
If you wanted to add predicted text and suggested transcriptions for this labeling configuration, you might use the following example JSON.
{
"data":{
         "text":"The world that we live in is a broad expanse of nothingness, said the existential philosopher, before he rode away with his cat on his motorbike. "
      },
   "predictions":[
      {
            "result":[
               {
                  "value":{
                     "start":135,
                     "end":144,
                     "text":"motorbike",
                     "labels":[
                        "ORG"
                     ]
                  },
                  "id":"def",
                  "from_name":"ner",
                  "to_name":"text",
                  "type":"labels"
               },
               {
                  "value":{
                     "start":135,
                     "end":144,
                     "text":[
                        "yay"
                     ]
                  },
                  "id":"def",
                  "from_name":"entity",
                  "to_name":"text",
                  "type":"textarea"
               }
            ]
      }
   ]
}
Because the TextArea tag applies to each labeled region, the IDs for the label results and the textarea results must match.
Read only and hidden regions
In some situations it’s very helpful to hide or to make read-only bounding boxes, text spans, audio segments, etc. You can put "readonly": true or "hidden": true in regions to achieve this (the dict inside of annotations.result list).
Troubleshoot exports
HTML label offsets are in the wrong places
If the offsets for exported HTML labels don’t match your expected output, such as with HTML named entity recognition (NER) tasks, the most common reason why is due to HTML minification. When you upload HTML files to Label Studio for labeling, the HTML is minified to remove whitespace. When you annotate those tasks, the offsets for the labels apply to the minified version of the HTML, rather than the original unmodified HTML files.
To prevent the HTML files from being minified, you can use a different import method. See Import HTML data for more.
If you want to correct existing annotations, you can minify your source HTML files in the same way that Label Studio does. The minification is performed with the following script:
import htmlmin

with open("sample.html", "r") as f:
html_doc = f.read()

minified_html_doc = htmlmin.minify(html_doc, remove_all_empty_space=True)
If minification does not seem to be affecting the offset placements, complex CSS or other reasons could be the cause.